
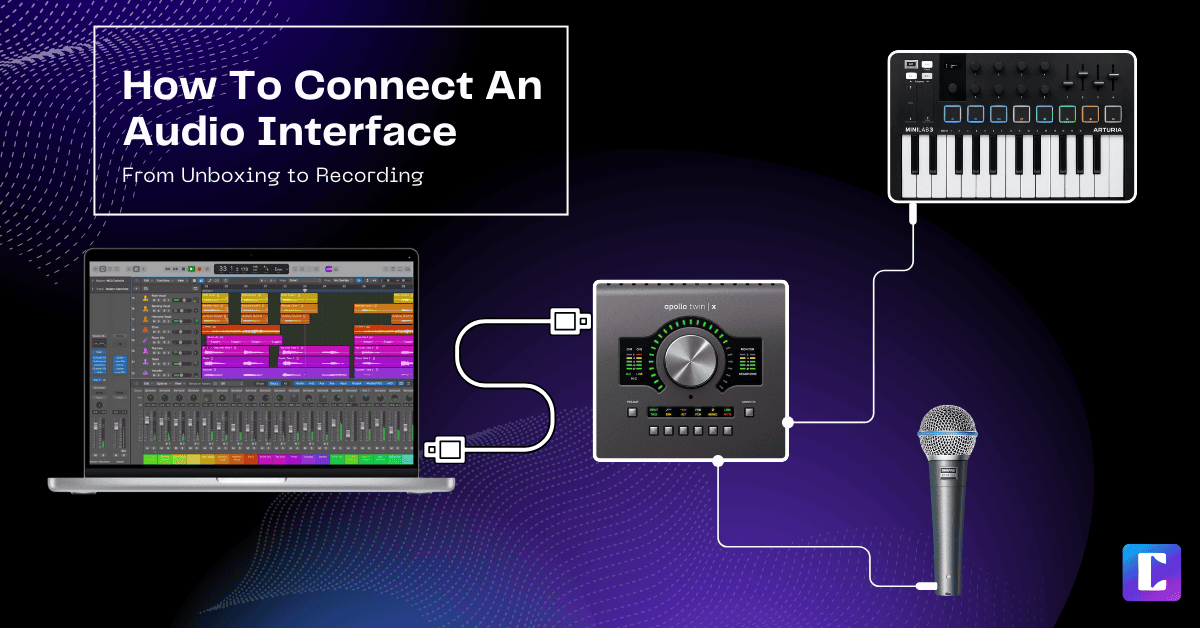
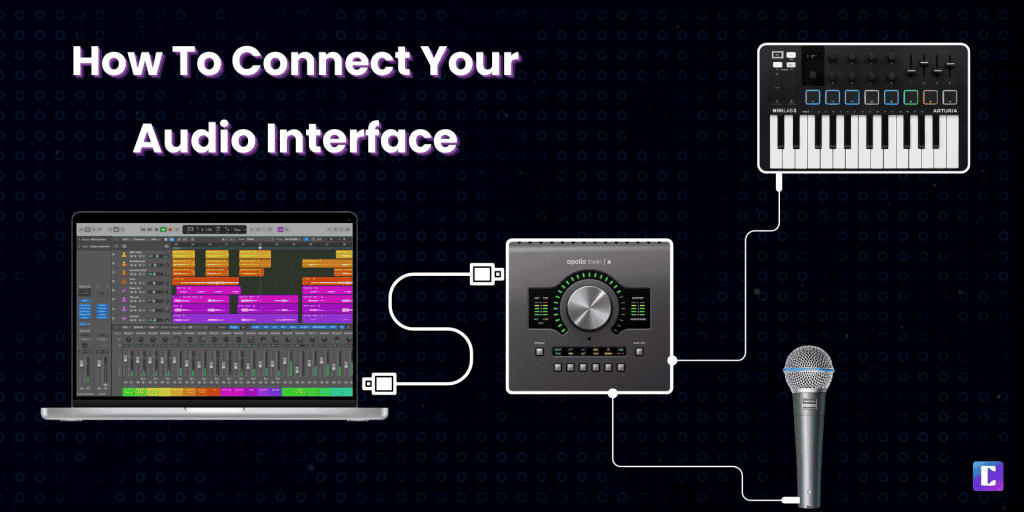
How to connect an audio interface: From Unboxing to recording
After spending over a decade setting up recording studios and helping hundreds of producers troubleshoot their audio interfaces, I’ve learned that proper setup isn’t just about plugging things in – it’s about understanding how all the pieces work together.
I’ve written this guide as a companion to my round-up of the best audio interfaces in 2025. It will help you achieve the clean, professional sound you’re after. You’ll get more info than you need for an initial setup, so make sure you check the table of contents if you have a specific question or problem you are facing. You’ll also do well if you pair your audio interface with one of the best microphones for vocals.
This blog post is part of my larger and more comprehensive vocal production guide, so check that out to get a full-fledged explanation of how to produce vocals. And if you’re looking for other pieces of gear to complete your signal chain, check out my complete guide for the best vocal production gear. And if you are on a tight budget, I’ve got you covered in our blog post on how to set up your home studio on a budget.
Let’s turn to audio interfaces!
TLDR: How to Connect An Audio Interface
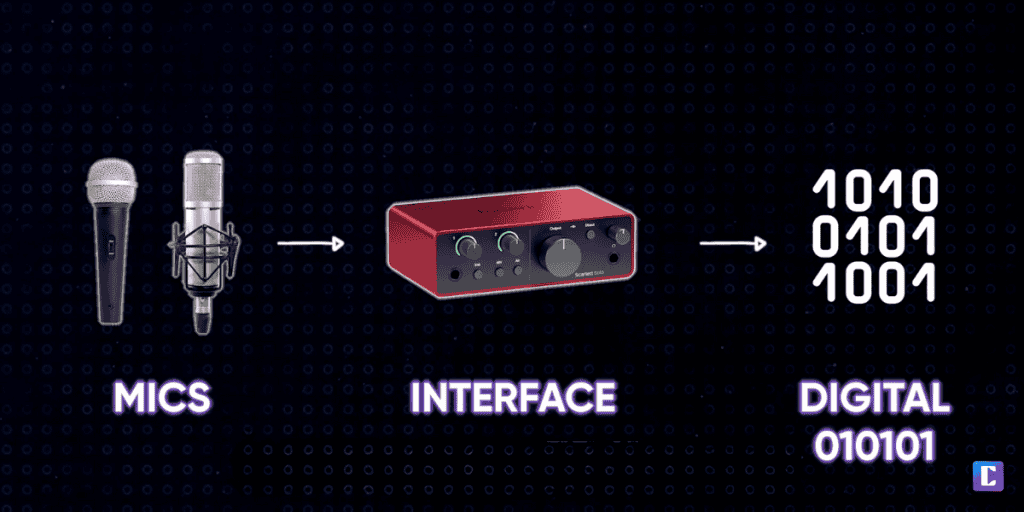
- Your audio interface converts analog signals (like microphones and instruments) to digital signals your computer can understand, and back again for playback
- Key technical specs to remember:
- Sample Rate: 44.1kHz for music, 48kHz for video
- Bit Depth: Use 24-bit for professional quality
- Latency: Aim for under 10ms for real-time recording
- Essential setup steps:
- Install proper drivers before plugging in your interface
- Use balanced cables whenever possible to avoid noise
- Set appropriate buffer sizes (low for recording, high for mixing)
- Document your working setup for future reference
- Pro tips:
- Keep your interface away from wireless routers and power supplies
- Create and save templates for different recording scenarios
- Regular driver updates and maintenance prevent most common issues
- Don’t get caught up in marketing hype – focus on clean signal paths and reliable connections
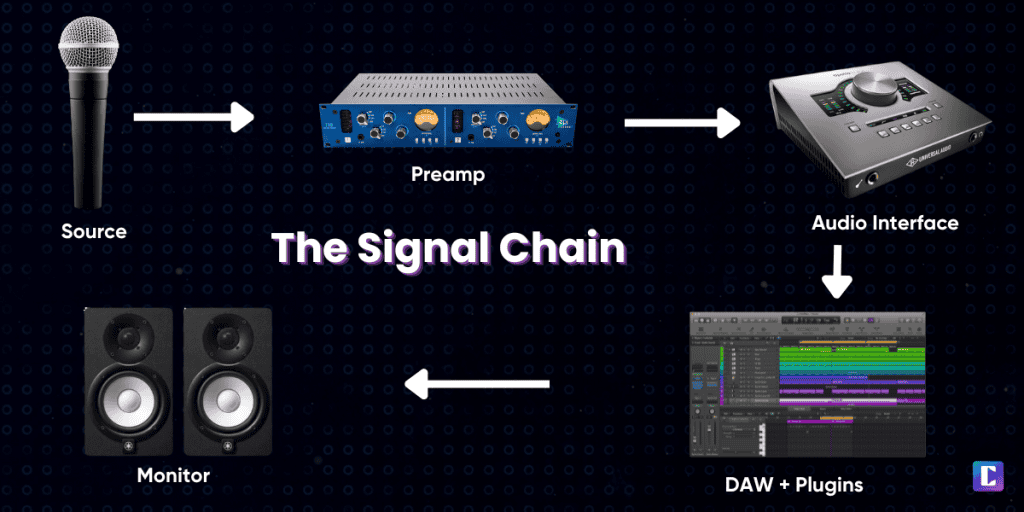
Understanding Audio Interface Basics
Think of your audio interface as your studio’s heart – pumping pristine audio signals between your analog gear and digital domain. After a decade of studio work, I’ve learned what specs actually matter versus what’s just marketing fluff.
What’s An Audio Interface?
Simply put, it’s a specialized translator that converts analog signals (like your guitar or mic) into digital data your computer can understand, and back again for playback. But like every other piece of the signal chain – not all interfaces are created equal.
Connection Types Compared
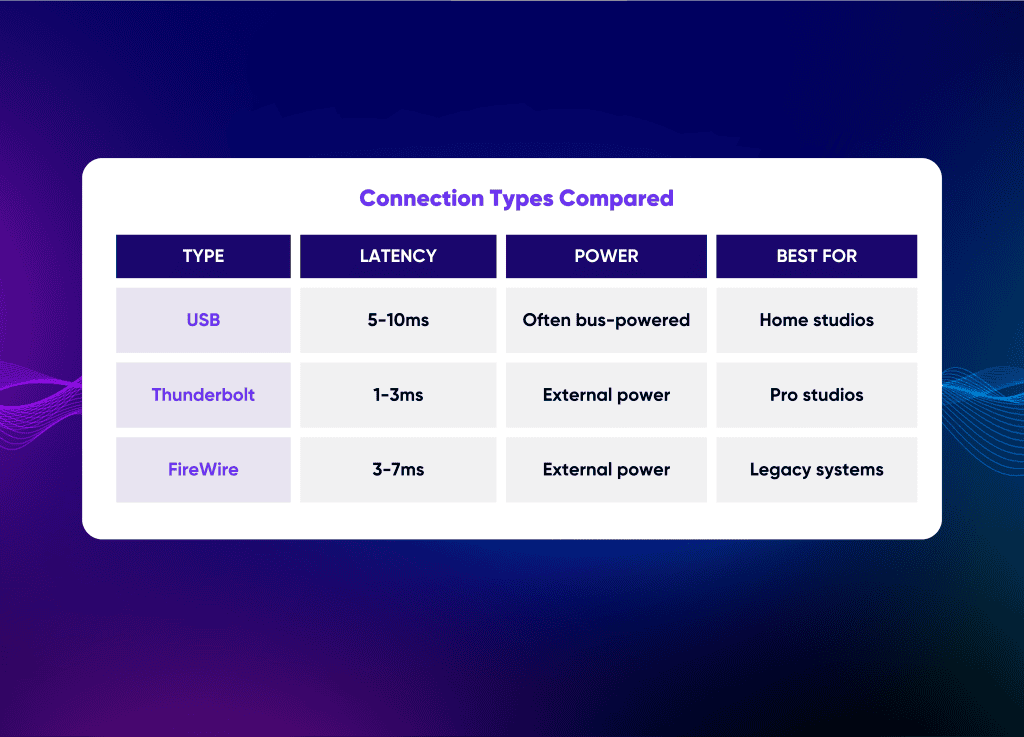
Power Considerations
Bus-powered interfaces are convenient but can struggle with phantom power for mics. I learned this the hard way during a vocal session – always pack that power supply!
Essential Specs That Matter
- Sample Rate: 44.1kHz for music, 48kHz for video
- Bit Depth: 24-bit is industry standard
- Latency: Lower is better (under 10ms is ideal)
💡Pro Tip: Don’t get caught up in marketing hype about ultra-high sample rates. Focus on preamp quality and real-world performance instead.
Next up, let’s dive into choosing the right connections for your setup – because nothing kills creativity faster than realizing you can’t connect your gear!
How to Connect Your Audio Interface: Understanding Preamps and Signal Flow
Every microphone needs a boost – it’s just how physics works. Think of it like turning up the volume on a quiet YouTube video. Without that boost (which we call preamp gain), you’d barely hear anything. Let’s break down how this all works when connecting your interface.
What Exactly Does a Preamp Do?
Your microphone puts out a tiny electrical signal – so tiny that your computer can’t really work with it. A preamp’s job is simple: make that signal stronger without messing up the sound. It’s like having a perfect translator who makes your voice louder without changing your words.
Built-in vs External Preamps: Making the Choice
| Type | Pros | Cons |
|---|---|---|
| Built-in Interface Preamps | • Convenient • Cost-effective • Good enough for most uses | • Fixed quality • Limited character • Can’t upgrade |
| External Preamps | • Superior quality • Different sound flavors • More control | • Extra cost • More complex setup • Takes more space |
Here’s the good part: Most modern audio interfaces come with really decent built-in preamps. You probably don’t need anything else to get started!
Understanding Preamp Quality
Background Noise Levels (EIN)
Think of this like a TV’s static – less is better:
- Super clean: -120dB or lower
- Pretty good: -115dB to -120dB
- Might hear some noise: Above -115dB
How Much Boost (Gain) You Need
Different mics need different amounts of help:
For Standard Studio Mics (Condensers):
- Usually need 60dB boost
- These are your typical recording mics
- Pretty sensitive on their own
For Live/Broadcast Mics (Dynamics):
- Need more help (70dB+ boost)
- Think radio DJ mics (like the SM7B)
- Need more power to work well
- Great for podcasts and streaming
💡 Quick Tip: If your interface isn’t strong enough for a dynamic mic, don’t panic! A Cloudlifter can give you that extra boost without buying a whole new interface.
I’ve written a whole blog post answering the question of “Do I need preamp?” This will be very helpful if you want to make your mind up on whether the built-in preamp in your audio interface is enough.
Remember: You don’t need to spend a fortune here. The best setup is the one that works for what you’re doing right now.
Choosing the Right Connections
Let’s demystify the spaghetti junction of cables you’ll encounter in your audio journey. After countless studio setups, I’ve developed a foolproof approach to understanding connection types.
Essential Input Types
Remember when I tried plugging a guitar directly into an XLR input? Rookie mistake! Here’s what you actually need to know:

Balanced vs. Unbalanced: The Real Deal
Balanced cables contain three wires: two for the audio signal (with one inverted) and a ground wire. When these signals reach the destination, any noise picked up along the way gets cancelled out. Unbalanced cables only have two wires, making them susceptible to interference – that’s why you might hear buzzing or humming when using them for long cable runs.
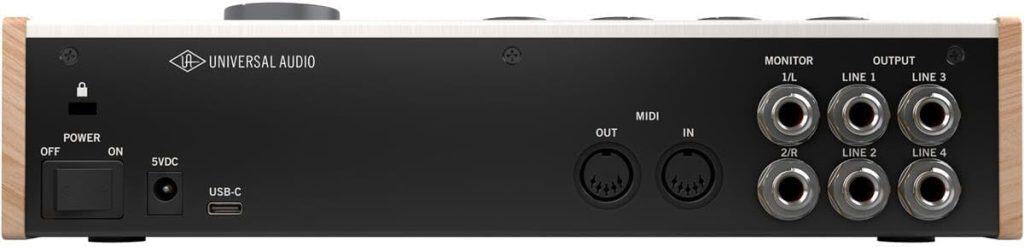
Digital Expansion Options
- ADAT: A digital protocol that sends 8 channels of audio through a single optical cable. It’s like having 8 additional inputs/outputs without needing more analog connections
- S/PDIF: Carries 2 channels of digital audio (stereo) through either a coaxial or optical cable. Common for connecting digital devices like CD players or DAT recorders
- Word Clock: A synchronization signal that ensures all digital devices in your setup are perfectly timed together, preventing pops, clicks, and digital artifacts
This clarity about cabling and digital connections is crucial for preventing noise issues and ensuring proper synchronization in more complex setups.
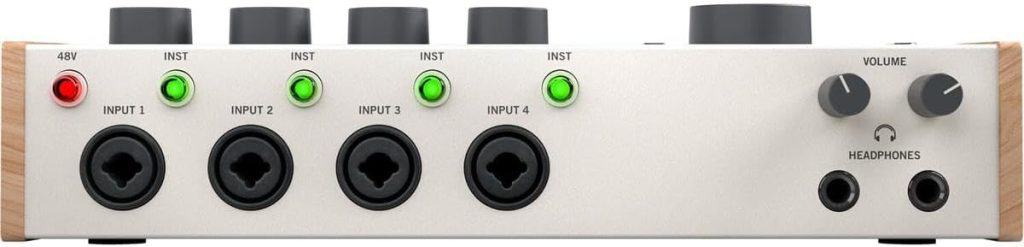
Phantom Power (+48V) Explained
Phantom power is essential when using a condenser mic. These mics don’t have internal power; they need to get it from outside. That is what phantom power is, and external source of power.
Future-Proofing Tips
Calculate your current needs, then double it. You’ll thank me when your setup grows. I started with a 2-in/2-out interface and outgrew it within months. You might think that a solo interface is enough for you, but sooner rather than later, you’ll wish you had more than one input.
Ready to physically set up your interface? Let’s get those drivers installed first – I’ve got some time-saving tricks up my sleeve.
Initial Hardware Setup
Before we dive into software configuration, let’s get your interface physically situated. Here are the factors you need to put in.
Placement Matters
Your interface needs to breathe! I once crammed mine into a tight shelf space, and it started glitching from overheating.
Here’s my placement checklist:
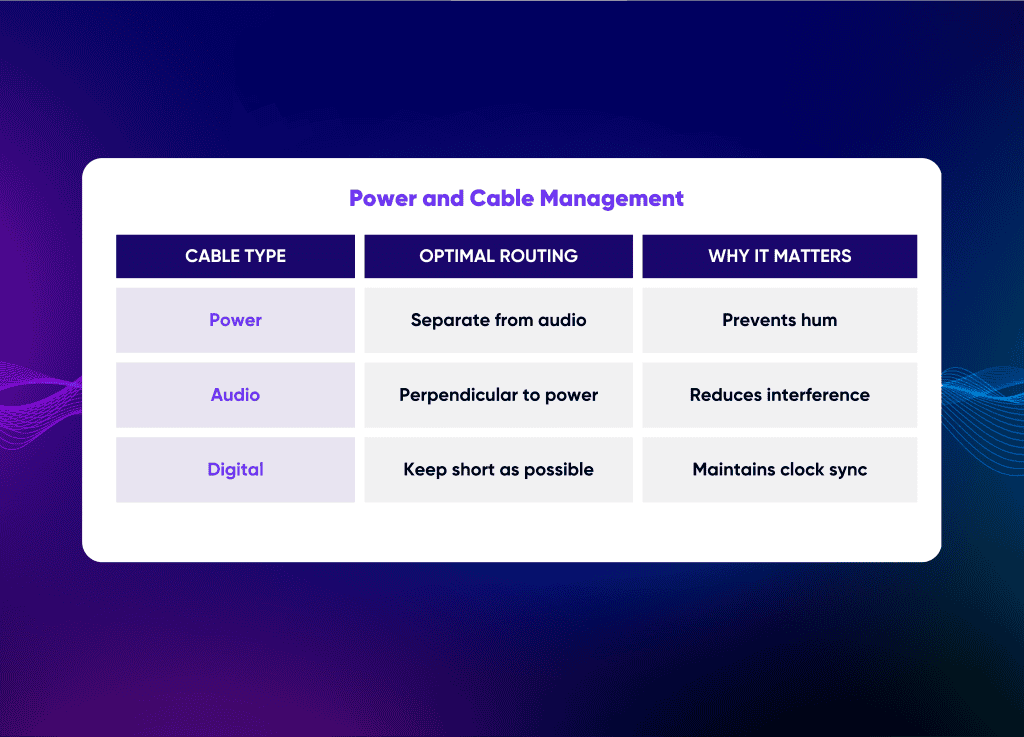
Power and Cable Management
Direct Monitoring Setup
Always set up direct monitoring before opening your DAW. It’s your safety net when troubleshooting. Trust me – you’ll want zero-latency monitoring when laying down that perfect vocal take.
Multiple Interface Configuration
Running more than one interface? Start with your primary interface’s clock settings before adding others. I learned this one the hard way during a 24-track session that turned into an expensive lesson in digital clocking.
Next up: driver installation – where the real magic (or troubleshooting) begins!
Driver Installation and Updates
The number one studio nightmare I encounter? Driver issues. Here is what to do when you see the “interface not found” message, I’ve got this down to a science.
Finding the Right Drivers
Skip the sketchy driver websites – I made that mistake once and spent a week removing malware. Here’s my trusted process:
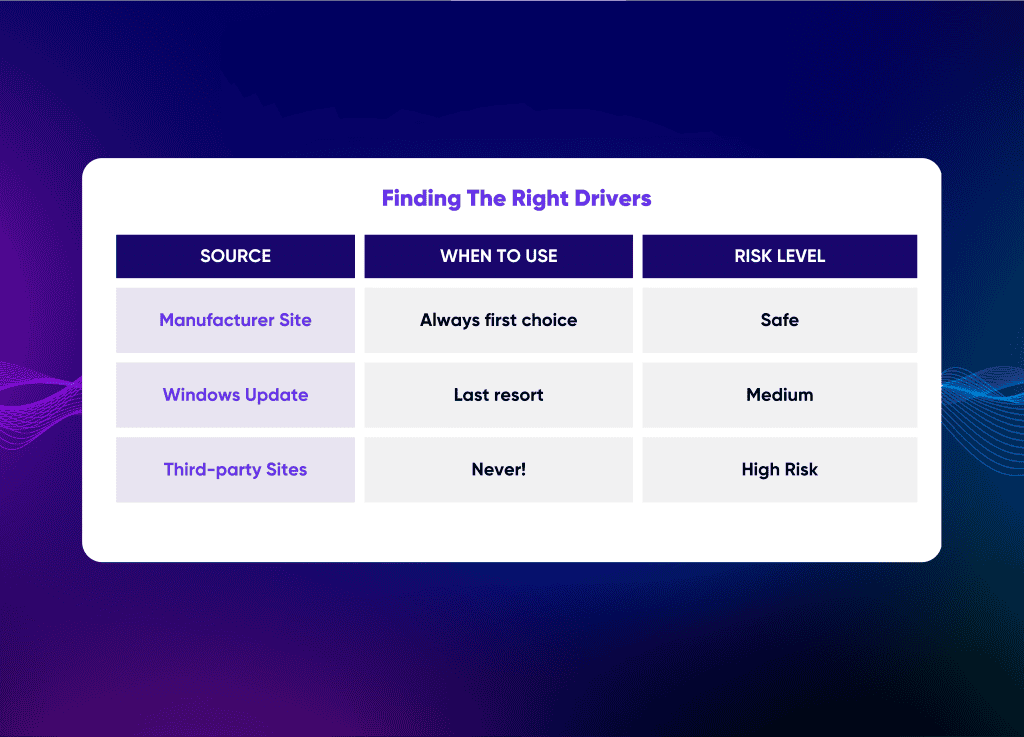
Clean Installation Process
- Unplug your interface (yes, before installing!)
- Remove old drivers completely
- Restart your computer (don’t skip this)
- Install new drivers
- Plug in interface last
ASIO vs. Core Audio
Mac users, you’ve got it easy with Core Audio. Windows folks, ASIO is your best friend. Running Windows? Grab ASIO4ALL as a backup – it’s saved my bacon during many emergency sessions.
Firmware Updates
Think of firmware like your interface’s brain surgery – don’t interrupt it! I once lost power during an update and had to ship my interface back to the manufacturer. Not fun.
Moving on to system integration – where we’ll make your computer and interface play nice together!
System Integration
After your drivers are installed, it’s time for the secret sauce – proper system integration. This is where average setups become professional ones.
Windows Optimization Magic
I once had a client’s PC running like molasses until I discovered these tweaks:
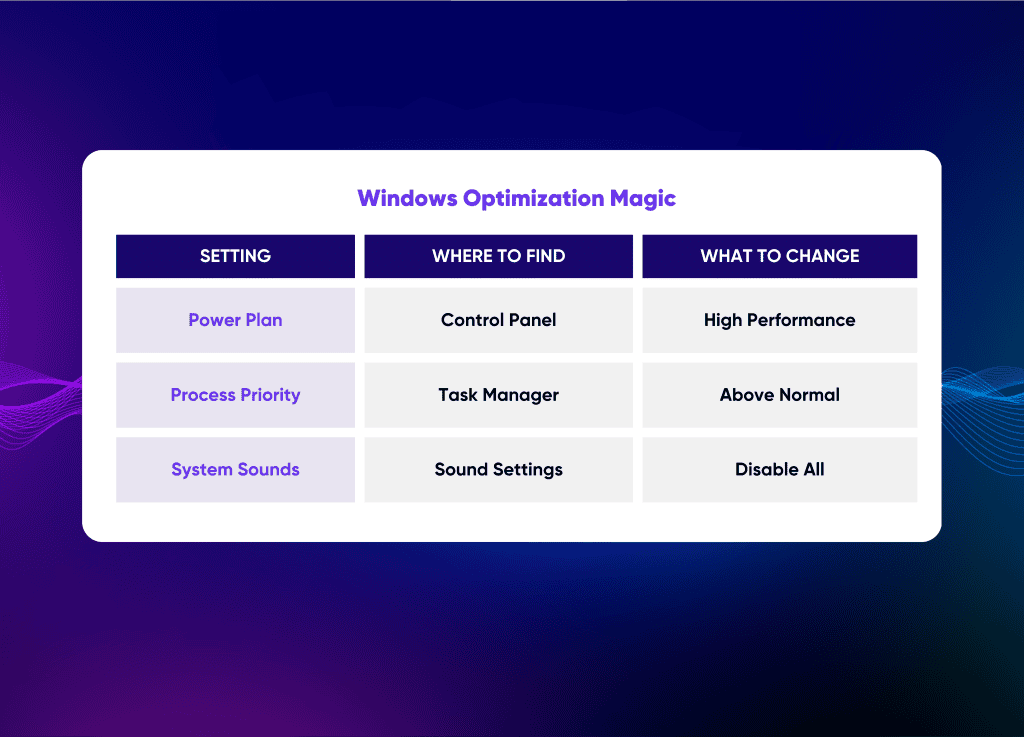
💡Pro Tip: Disable Windows Fast Startup – it seems counterintuitive, but trust me, your interface will thank you.
macOS Sweet Spots
Core Audio is fantastic, but it needs these tweaks:
- Create a dedicated aggregate device
- Disable App Nap for your DAW
- Set up Multi-output if needed
MIDI Mayhem Solved
Remember to keep your MIDI routes simple. I once created a MIDI feedback loop that crashed an entire live set. Learn from my fail:
- Check MIDI thru settings
- Disable unused MIDI ports
- Document your routing (Just a quick note, doesn’t need to be elaborate…future you will be grateful)
Your MIDI Thru settings determine whether incoming MIDI messages get passed along to other devices. Here’s the safe setup:
| MIDI Setting | Configuration | Why |
|---|---|---|
| MIDI Thru | OFF for interfaces | Prevents loops |
| Hardware MIDI Thru | ON only for controllers | Allows direct control |
| Soft Thru | OFF in DAW | Reduces latency |
For example: If you’re using a MIDI keyboard → interface → DAW, you want MIDI Thru off on the interface but enabled on the keyboard. This way, your keyboard data goes directly to your DAW without creating potential feedback loops through the interface.
Think of it like a one-way street – MIDI data should flow in a single direction, from controller to destination.
Buffer Size Balancing Act
Here’s my golden ratio:
- Recording: 128 samples
- Mixing: 512 samples
- Mastering: 1024 samples
Clock Synchronization
Multiple interfaces? Pick one master clock and stick to it. When I do multi-room recording, the master clock is always the interface closest to the main recording space.
Let’s tackle DAW configuration next – where the real fun begins!
DAW Configuration
Let’s get your DAW and interface working together like a well-oiled machine. After years of teaching production classes, I know this is where most creators get tangled up.
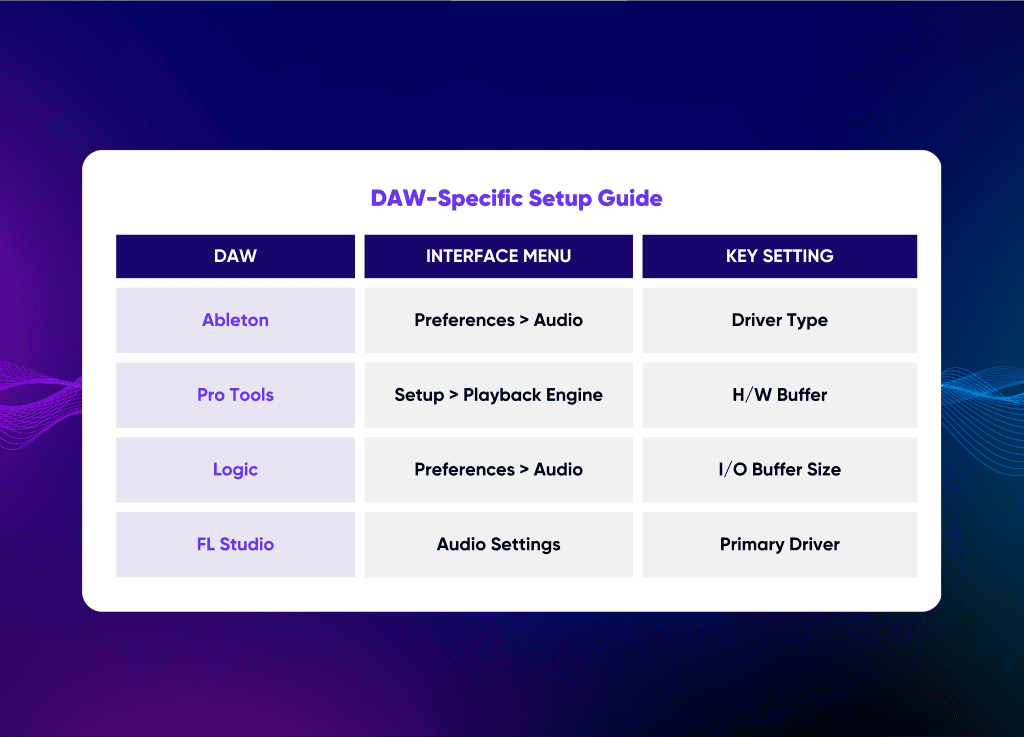
DAW-Specific Setup Guide
Quick reference for popular DAWs:
Audio Preferences Sweet Spot
Here’s what I learned from countless troubleshooting sessions:
- Start with 44.1kHz unless video work demands 48kHz
- Keep bit depth at 24-bit
- Match interface and DAW sample rates exactly
Template Mastery: DAW Setup Templates
1. Minimal (Tracking) Template
- Basic I/O routing only
- Zero plugins except monitoring FX
- Pre-routed mic inputs and DI channels
- Basic headphone mix setup
- Low buffer size settings
- Disabled unused tracks/buses
2. Production (Full Suite) Template
- Complete plugin chains on channels
- Virtual instruments loaded
- Effect sends configured
- Advanced routing for parallel processing
- Higher buffer size for plugin stability
- Organized track colors and groups
- Common sound design tools ready
3. Mixing (Routing) Template
- Dedicated buses (drums, vocals, instruments)
- Pre-configured mix bus processing
- Reference track routing
- Print tracks setup
- Multiple output options (streaming, mastering)
- Metering plugins loaded
- Track naming conventions established
💡Pro Tip: Save these templates with your optimal buffer settings and audio preferences pre-configured. Include a basic README text track in each template noting important routing info and settings. This documentation has saved countless sessions when returning to projects months later.
Remember: Keep templates lean – only include what you use 90% of the time. You can always add specific tools for unique project needs.
Routing Like a Pro
My routing matrix changed the game for my workflow:
- Main output (monitors)
- Cue mix (headphones)
- FX sends (parallel processing)
- Print track (final bounces)
Plugin Latency Tricks
Mind-blowing fact: Some plugins can add up to 4096 samples of latency! To counteract this, use these lifesavers:
- Enable automatic delay compensation
- Group high-latency plugins on aux channels
- Use low-latency mode when tracking
Next up: advanced features that’ll take your setup from good to incredible!
Advanced Features
After mastering the basics, it’s time to unlock your interface’s full potential. These advanced features separate the pros from the beginners.
Low-Latency Monitoring Magic
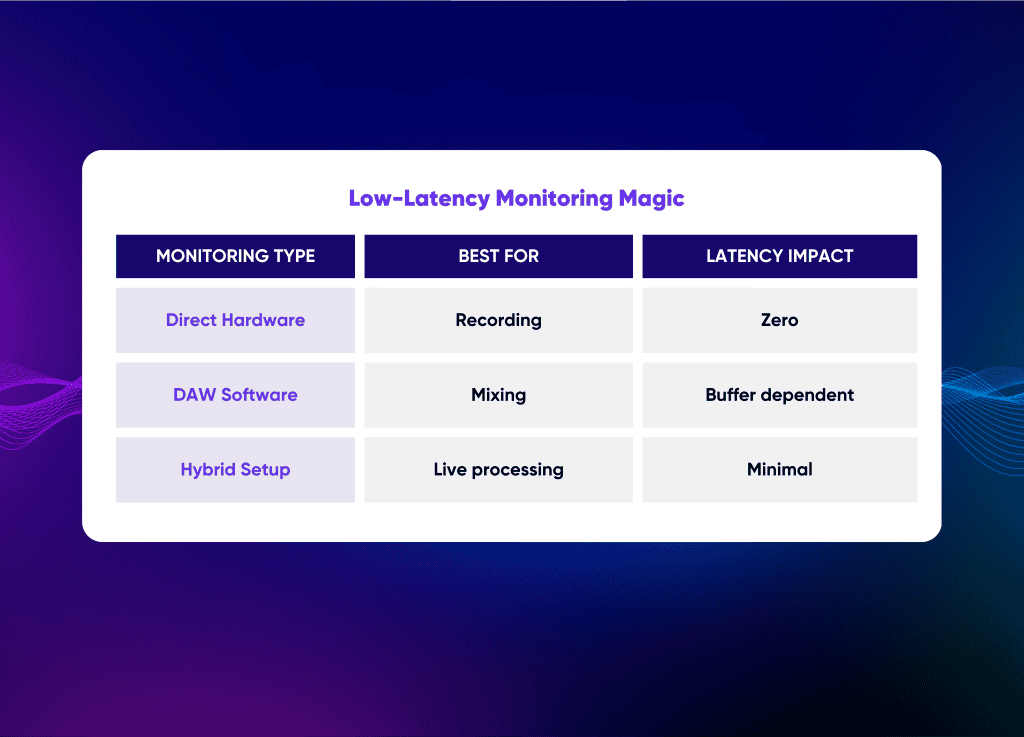
Cue Mix Mastery
Ever had a vocalist complain about their headphone mix? Here’s my foolproof cue system:
- Create dedicated aux sends
- Set up independent volume control
- Add comfort reverb on hardware
- Keep it clean and simple
Multi-Interface Setups
Pro Tip: I learned this one the hard way – always designate one interface as the master clock. Made this mistake at a festival once… never again!
Hardware Integration
Got outboard gear? Try this signal flow:
- Interface → Hardware → Return
- Use pre/post-fader sends
- Monitor both wet/dry signals
DSP Effects
Those built-in DSP effects aren’t just marketing fluff. I use them to:
- Track through compression
- Add zero-latency reverb for vocalists
- Create custom headphone mixes
Ready to optimize this setup like a pro? Let’s dive into professional tweaks next.
Professional Optimization
After years of running a high-traffic studio, these optimization tricks have become my secret weapons. Let’s make your setup purr.
Latency Ninja Moves
My proven latency-killing stack:
- Process-hungry plugins on dedicated tracks
- Freeze CPU-heavy instruments
- Use pre-computed effects when possible
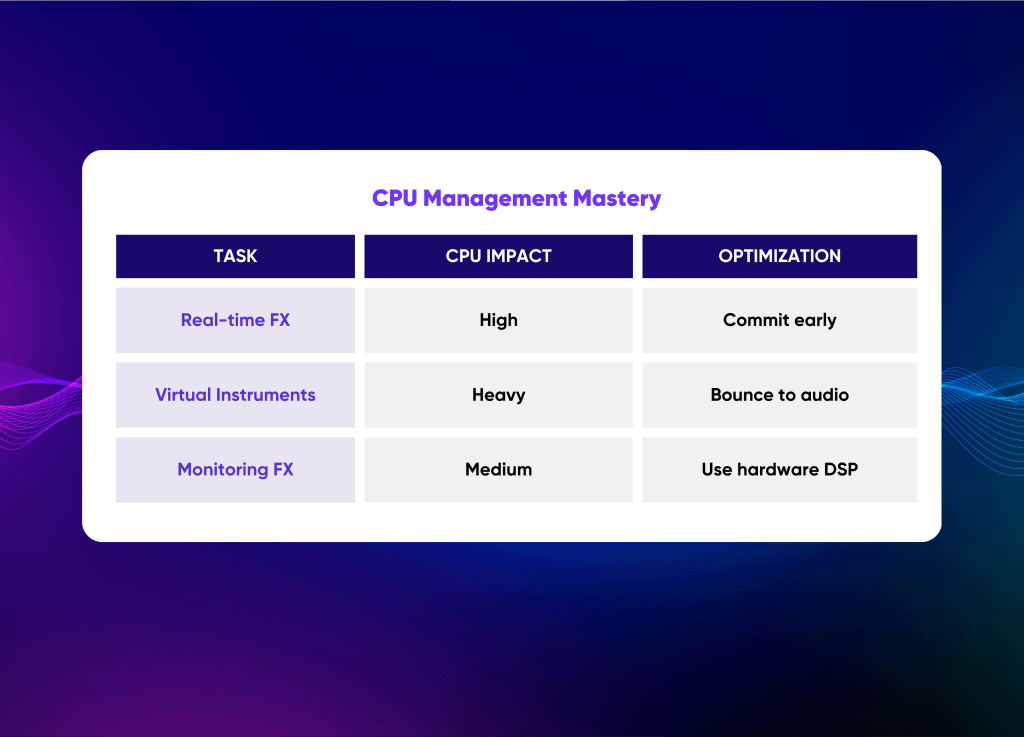
CPU Management Mastery
Custom Routing Schemes
Here’s my go-to routing architecture:
- Parallel processing buses
- Dedicated reverb sends
- Print-ready master chain
- Multiple cue mixes
Monitor Control Magic
Pro Tip: Invest in a proper monitor controller. I wasted years with software volume control until I discovered the clarity of proper analog attenuation.
MIDI Routing Excellence
- Create instrument-specific MIDI buses
- Use MIDI filters for cleanup
- Set up transform maps
- Keep latency compensation in check
Next up: final thoughts on maintaining your optimized setup!
Comprehensive Troubleshooting
After rescuing countless sessions from technical disasters, I’ve developed a systematic approach to interface problems. Let’s tackle the gremlins that plague even the best setups.
Signal Flow Detective Work
Check your signal path in this order:
- Physical connections
- Input gain staging
- DAW routing
- Output settings
Pro Tip: I keep a cheap $10 cable tester in my bag – it’s saved more sessions than my expensive gear!
Driver Drama Solutions
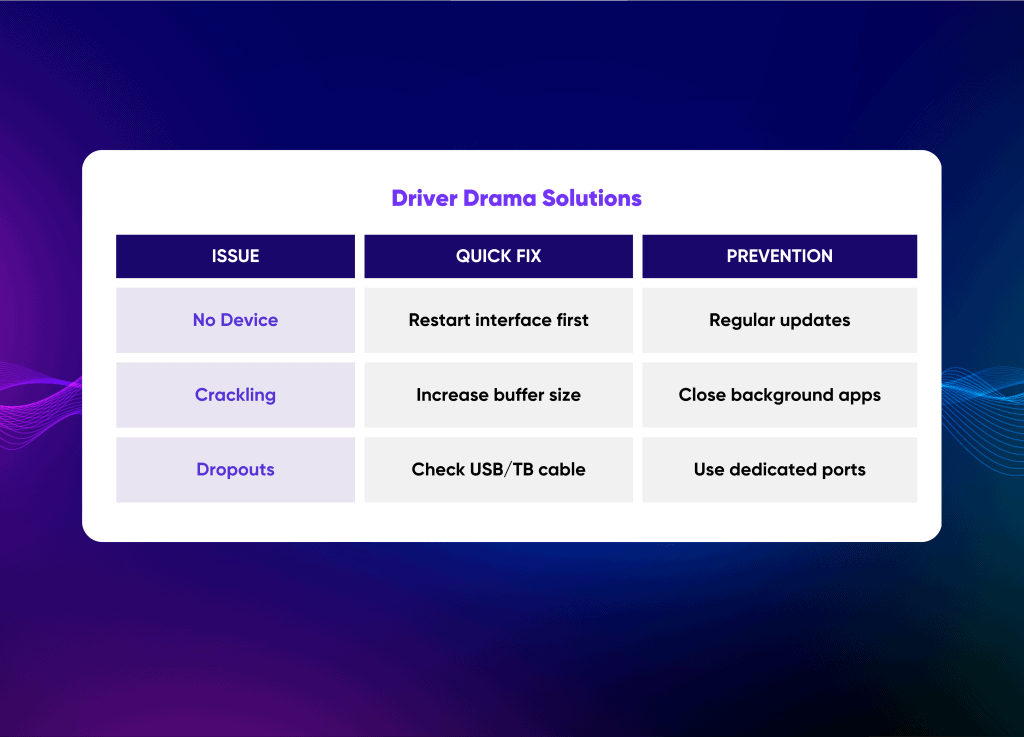
Ground Loop Warfare
That mysterious hum? Usually a ground loop. My tried-and-true fixes:
- Power everything from one strip
- Use balanced cables
- Last resort: lift ground (carefully!)
Clock Catastrophes
Lost your clock sync? Follow this rescue sequence:
- Set one master clock
- Match all sample rates
- Reconnect devices in order
Remember: Always document your working setup. I once spent three hours troubleshooting, only to realize I’d forgotten my own working configuration from the week before!
Conclusion
Setting up an audio interface might seem daunting at first, but it’s really about understanding the basics and building from there. Throughout my years in studio work, I’ve learned that the best setup is one that you understand and can troubleshoot yourself. Don’t get caught up in the specs race – focus on creating a reliable, clean signal path that serves your specific needs.
Remember to document your setup, keep your drivers updated, and maintain good cable management. These habits might seem boring, but they’re the foundation of a professional studio setup. Whether you’re recording a podcast, producing music, or running a professional studio, these principles will serve you well.
The most important thing? Don’t let technical details paralyze you. Start with the basics, make sure everything is connected properly, and then build your expertise as you go. Your perfect setup will evolve with your needs, and that’s exactly how it should be.
FAQ: How To Connect An Audion Interface
You can get a very capable interface for $150-300. While high-end interfaces can cost thousands, most modern mid-range interfaces have excellent preamps and converters that are more than adequate for professional work. Focus on getting an interface with the right number of inputs/outputs for your needs rather than chasing premium prices. You can find a great round-up of the best audio interfaces here.


