
7 Best Audio Interfaces in 2025 For vocal recording: Reviewed By a 40M+ Producer

The audio interface stands as the cornerstone of any recording setup; regardless of how expensive and sophisticated your mic or MIDI controller is, your audio interface is the gatekeeper. You can’t go above what the interface gives you.
As someone who’s spent over a decade recording and producing music, amassing more than 40 Million streams, I’ve learned that choosing the right audio interface can make the difference between pristine recordings and endless frustration.
This guide will walk you through everything you need to know about the best audio interfaces – from basic to advanced features, helping you make an informed decision that matches your needs and budget. You can also check out my guide on how to connect an audio interface so you can get your setup ready in no time.
If you are looking to match your audio interface with the right inputs, you can check out our round-up of the best microphones for vocals and the best MIDI keyboards. And for a more comprehensive home studio setup, you can check out my complete list for the best vocal production gear guide.

TLDR: the best audio interfaces for 2025
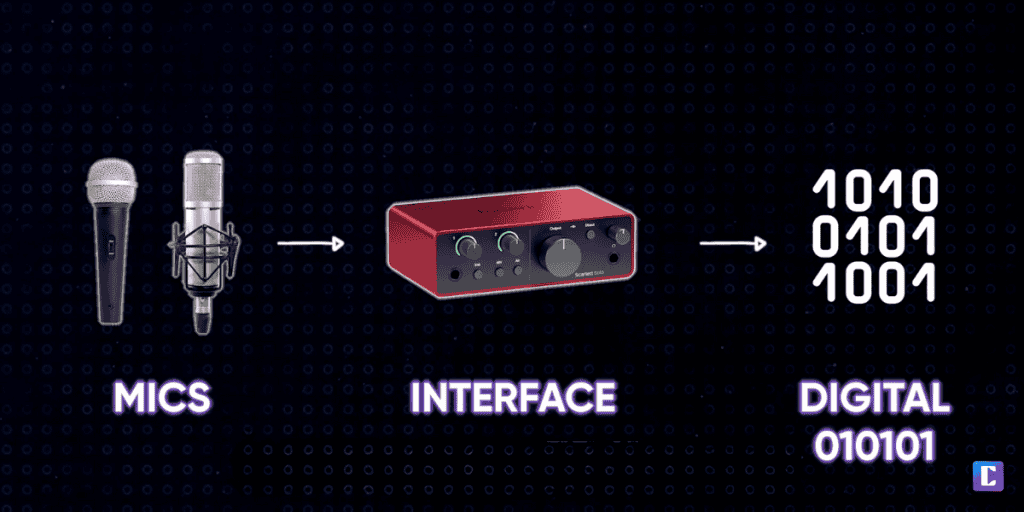
- An audio interface converts analog audio signals (like guitars and microphones) into digital signals for your computer, and vice versa.
- Key features to consider: preamp quality, number of inputs/outputs, connection type (USB, Thunderbolt, etc.), and latency performance.
- Budget options like the Focusrite Scarlett 2i2 (~$200) are perfect for beginners, while professional setups might benefit from higher-end interfaces like the Universal Audio Apollo series ($1,500+).
- Choose based on your current needs with room for modest growth – don’t overspend on features you won’t use.
- Reliable drivers and quality preamps matter more than fancy specifications.
- My Bottom Line Personal Advice: Never buy a single input audio interface!
Affiliate Disclaimer: We are reader-supported through earned commissions when you buy through our links.
What is an Audio Interface?
After recording and producing music for over a decade, I’ve learned that an audio interface is the most crucial piece of gear in any studio setup. Whether you’re just starting out or looking to upgrade, understanding what an interface does will save you countless hours of frustration and money spent on the wrong gear.
The Basic Definition
An audio interface is your studio’s translator:
- Converts analog signals (instruments/mics) → digital (computer)
- Converts digital signals → analog (speakers/headphones)
- Acts as the heart of your recording setup
Why Not Just Use Your Computer?
You might be wondering, “do I really need an audio interface? Can’t I just use my built-in sound card?” Well, the truth is, if you want to take audio production seriously, an audio interface is a must!
Whether you are connecting a microphone or a MIDI controller, your built-in sound card cannot handle this nearly as well as an interface. Even an entry-level interface is miles ahead of a very decent sound card.
Audio Interface
Built-in Sound Card
Key Functions
Your interface handles crucial tasks:
- Signal Amplification
- Boosts microphone signals cleanly
- Provides phantom power for condenser mics
- Conversion
- Analog → Digital (recording)
- Digital → Analog (playback)
- Monitoring
- Zero-latency tracking
- Direct input monitoring
- Headphone amplification
Primary Use Cases
You can use your audio interface for all kinds of production activities including:
- Vocal recording
- Guitar/bass tracking
- Podcast production
- Beat making
- Full band recording
- Live streaming
- Voice-over work
Looking back at my early recording days, I wish someone had explained all this to me sooner. The right audio interface can transform your recording space from a basic setup into a professional studio. Now that you understand what an interface does, let’s dive into the technical specs you need to know before making your choice.
Understanding Audio Interface Specs
Here’s something most manufacturers won’t tell you: bigger numbers don’t always mean better sound. I’ve spent thousands on “high-spec” interfaces, and I’ve learned that understanding these specifications is more important than chasing the highest numbers.
Sample Rate & Bit Depth Explained
Imagine taking a video of someone walking. The more frames per second you capture, the smoother the motion looks. Sample rate works the same way with audio – it’s how many “snapshots” of sound your interface takes per second.
Bit depth, on the other hand, is like the resolution of each snapshot. Let me break this down into practical terms that’ll help you choose the right settings.
| Spec | What It Means | What You Actually Need |
| 44.1kHz | CD-quality | Perfect for most recording |
| 48kHz | Standard professional | Ideal for video work |
| 96kHz | High-resolution | Future-proofing |
| 192kHz | Ultra high-res | Typically overkill |
Bit Depth Options:
- 16-bit: ❌ Outdated
- 24-bit: ✓ Industry standard
- 32-bit: 🤔 Nice but not necessary
Latency & Buffer Size
Think of buffer size like a water pipe:
- Smaller buffer = Less latency but more CPU strain
- Larger buffer = More latency but stable performance
Recommended Settings:
- Recording: 64-128 samples
- Mixing: 512-1024 samples
- Mastering: 1024+ samples
Understanding the Preamp-Audio Interface connection
Let me demystify preamps with a simple analogy: imagine trying to hear someone whispering from across a room. A preamp is like having a friend stand next to the whisperer and relay the message louder – but without adding their own voice or interpretation to it. That’s what a good preamp does for your microphone’s signal.
What’s a Preamp?
A preamp (preamplifier) boosts your microphone’s weak signal to a level that your interface can properly record. Without this boost, your recordings would be too quiet or full of noise.
Built-in vs. External Preamps
| Type | Pros | Cons |
|---|---|---|
| Built-in Interface Preamps | • Convenient • Cost-effective • Good enough for most uses | • Fixed quality • Limited character • Can’t upgrade |
| External Preamps | • Superior quality • Different sound flavors • More control | • Extra cost • More complex setup • Takes more space |
Good news: Most modern interfaces include built-in preamps that are plenty good for home recording!
Preamp Quality Specs Explained
1. Equivalent Input Noise (EIN)
- Think of this as the preamp’s “background noise level”
- Lower numbers = cleaner sound
- The sweet spot:
- -120dB or better = Professional quality
- -115dB to -120dB = Very good
- Above -115dB = May hear noise in quiet recordings
2. Maximum Gain
Different mics need different amounts of gain:
- Condenser mics:
- 60 dB+ gain is usually enough
- These are your typical studio mics
- More sensitive, need less gain
- Dynamic mics:
- Need 70 dB+ gain
- Like the Shure SM7B
- Less sensitive, need more boost
- Popular for podcasting/streaming
💡 Pro Tip: If you’re using dynamic mics like the SM7B and your interface preamps don’t provide enough gain, don’t worry! You can always add an inline booster like the Cloudlifter rather than buying a whole new interface.
Remember: The best preamp is the one that works for your specific needs – you don’t always need the most expensive option to get great recordings.
Connection Types Compared
| Type | Speed | Stability | Recommendation |
| USB 2.0 | Good | Very stable | Great for beginners |
| USB-C | Excellent | Very stable | Best all-rounder |
| Thunderbolt | Best | Excellent | Pro studios |
| FireWire | Good | Stable | Outdated |
Trust me on this one: focus on getting an interface with quality preamps and stable drivers rather than chasing the highest specs. I’ve had 96kHz interfaces that sound better than 192kHz ones simply because of superior preamp design and conversion quality.
Now that we have understood the basics of audio interfaces, let’s move on to comparing the top options on the market, where we’ll see how these specs translate into real-world performance.
Best Audio Interfaces: Our Top 7 Picks
1. Focusrite Scarlett 2i2 (4th Gen)
The Focusrite Scarlett 2i2 (4th Gen) is one of the most popular and accessible audio interfaces for beginners and home studio users. It features two XLR/TRS combo inputs with switchable Air Mode, delivering high-quality preamp performance with a bright, polished tone. With a sleek design and easy setup, it’s perfect for singer-songwriters and podcasters alike.
Best For:
- Beginner producers, singer-songwriters, and podcasters seeking a budget-friendly yet high-quality interface.
- Home studios with limited space or equipment needs.
Why It’s Popular:
The Scarlett 2i2 has built a reputation for reliability, affordability, and sound quality. Its latest 4th Gen update includes improved preamps with greater dynamic range and Clip Safe technology to prevent distortion during recording.
Ideal Use Case:
- Perfect for recording vocals and acoustic instruments in home studio environments.
- Ideal for content creators requiring clean audio for voiceovers and podcasts.

Compatibility:
- Formats: USB-C
- OS: Windows, macOS
- Drivers: Easy plug-and-play setup for macOS, with Focusrite Control for detailed adjustments.
Pros:
- Affordable price point.
- Switchable Air Mode for enhanced clarity and brightness.
- Compact and portable.
- Comes with a useful software bundle, including DAWs and plugins.
Cons:
- Limited to 2-in/2-out, which may not suit larger setups.
- Lacks advanced features like DSP or expanded I/O.

Personal Take:
As someone who has worked with countless beginner setups, I can confidently say the Scarlett 2i2 is the perfect starting point for most people. The preamps are impressively clean for the price, and the Air Mode adds just enough sparkle to vocals and acoustic guitars. It’s lightweight, super easy to set up, and doesn’t overcomplicate things for someone just getting into recording. I’ve even used it in a pinch for quick demos on the go, and it never disappoints. For the price, it’s a no-brainer.
Special Consideration:
Clip Safe mode is a standout feature, ensuring distortion-free recordings even for beginners.

Focusrite Scarlett 2i2 (4th Gen)
United States
UK and Europe
2. Universal Audio Apollo Twin X (Duo or Quad)
The Universal Audio Apollo Twin X is a premium Thunderbolt 3 audio interface known for its superior AD/DA conversion, real-time UAD plugin processing, and Unison-enabled mic preamps. Available in Duo and Quad DSP configurations, it’s a staple for professional studios and demanding users.
Best For:
- Professionals seeking pristine audio quality and seamless integration with UAD plugins.
- Musicians and producers who want real-time effects while tracking.
Why It’s Popular:
The Apollo Twin X is renowned for its exceptional sound quality and ability to emulate classic analog gear through Unison technology. Its real-time DSP processing allows users to monitor with zero-latency effects, making it invaluable for tracking and mixing.

Ideal Use Case:
- High-quality vocal and instrumental recording with professional-grade audio fidelity.
- Perfect for solo artists and producers needing compact yet powerful hardware.
Compatibility:
- Formats: Thunderbolt 3
- OS: macOS, Windows
- Requirements: UAD hardware and DSP for plugin processing.
Pros:
- Pristine sound quality with premium AD/DA conversion.
- Access to UAD plugin library.
- Compact and elegant design.
- Low latency with real-time processing.
Cons:
- Requires Thunderbolt 3 connection.
- Premium pricing limits accessibility for budget users.

Personal Take:
The Apollo Twin X is the interface that lives on my desk for a reason. The sound quality is in a league of its own—everything you record through it just sounds polished. The Unison preamps are magical, especially when paired with UAD plugins; it’s like having an entire rack of high-end analog gear right at your fingertips. Whether I’m tracking vocals or adding a bassline, the real-time plugin processing makes everything feel effortless. It’s definitely an investment, but if you’re serious about your sound, this is where you should put your money.
Special Consideration:
Unison preamps are particularly useful for adding analog character to vocal recordings.

Universal Audio Apollo Twin X (Duo or Quad)
United States
UK and Europe
3. Solid State Logic SSL 2+
The Solid State Logic SSL 2+ delivers the coveted SSL sound in a compact, affordable audio interface. With two high-quality preamps and a unique 4K Legacy mode that emulates the warmth of SSL’s legendary consoles, it’s a favorite among home studio users seeking vintage analog character.
Best For:
- Producers and musicians looking for professional-grade sound at a mid-range price.
- Vocalists and instrumentalists seeking warmth and clarity in their recordings.
Why It’s Popular:
SSL’s legendary reputation for analog gear has been translated beautifully into the SSL 2+, offering pristine sound quality and a feature set tailored for home studios. The 4K mode is a standout for adding rich harmonic content to recordings.

Ideal Use Case:
- Ideal for recording vocals and instruments with an analog-inspired touch.
- Great for solo artists and small setups requiring MIDI support.
Compatibility:
- Formats: USB-C
- OS: macOS, Windows
Pros:
- High-quality preamps with 4K Legacy mode.
- Rugged and portable design.
- Excellent software bundle for music production.
Cons:
- Limited to two inputs, making it less suitable for larger setups.
- Requires driver installation for Windows users.

Personal Take:
The SSL 2+ surprised me. I expected it to be good—it’s SSL, after all—but the 4K Legacy mode blew me away. It’s like flipping a switch to add instant character to your tracks. The preamps are solid, the build quality feels premium, and it’s portable enough to toss in a bag. I’ve used it for tracking vocals and layering guitars, and it consistently delivers that polished, professional vibe. For anyone looking to add some analog warmth without spending a fortune, this is a gem.
Special Consideration:
The 4K Legacy mode is particularly effective for brightening and enhancing vocal recordings.

Solid State Logic SSL 2+
United States
UK and Europe
4. Universal Audio Apollo x8p
The Universal Audio Apollo x8p is a premium 8-in/8-out audio interface with Thunderbolt 3 connectivity and Unison-enabled preamps. Designed for professional studios, it offers pristine AD/DA conversion, real-time UAD plugin processing, and compatibility with analog gear.
Best For:
- Professional studios and producers recording multi-instrument setups or full bands.
- Users wanting access to UAD’s extensive plugin library and analog emulations.

Why It’s Popular:
With eight Unison-enabled preamps and UAD DSP, the Apollo x8p provides unparalleled flexibility and sound quality. It integrates seamlessly into both analog and digital workflows.
Ideal Use Case:
- Perfect for professional studios needing extensive I/O and top-tier sound.
- Great for recording large ensembles or complex mixes.
Compatibility:
- Formats: Thunderbolt 3
- OS: macOS, Windows
Pros:
- 8 Unison-enabled preamps for analog emulations.
- Pristine AD/DA conversion.
- Real-time plugin processing.
Cons:
- Requires Thunderbolt 3.
- Expensive for smaller setups.
Personal Take:
The Apollo x8p is nothing short of a powerhouse. I’ve just upgraded to it in my own studio and I have to say that is one investment I will not regret. I use it to record full bands, from drums to layered vocals, and the results are always pristine. The Unison-enabled preamps really shine when you want to capture a specific analog flavor—it’s like having a vintage console built into your interface. Yes, it’s pricey, but this is pro-level gear through and through. If you’re running a serious studio or tackling large, complex projects, the Apollo x8p is worth every penny.
Special Consideration:
A go-to for complex projects requiring high channel counts and exceptional audio fidelity.
5. Audient iD14 (MKII)

Audient iD14 (MKII)
The Audient iD14 (MKII) is a compact yet powerful 2-in/4-out USB-C audio interface featuring Audient’s renowned console-grade preamps and high-performance converters. Its intuitive design, flexible features, and affordability make it an excellent choice for home studios and mobile recording setups.
Best For:
- Singer-songwriters and solo producers seeking professional-quality sound in a compact form factor.
- Home studio users needing excellent preamps and straightforward usability.
Why It’s Popular:
Audient’s iD series is celebrated for its console-grade preamps and exceptional build quality. The iD14 (MKII) delivers on these fronts while adding USB-C connectivity and enhanced conversion quality, offering premium audio in a sleek, user-friendly package.
Ideal Use Case:
- Perfect for recording vocals and acoustic instruments with high-quality sound.
- Great for mobile recording setups due to its portability and robust build.
Compatibility:
- Formats: USB-C
- OS: macOS, Windows
- Driver Support: Reliable drivers for stable performance across systems.
Pros:
- Premium Audient preamps for clean, transparent audio.
- JFET DI input for recording instruments like guitars.
- Expandable via ADAT for additional inputs.
- Compact and portable.
Cons:
- Limited to 2 inputs without ADAT expansion.
- No onboard DSP for real-time effects.
Personal Take:
The iD14 punches way above its weight class. The preamps are stunningly clean, and the DI input makes tracking guitar and bass feel effortless. I’ve used it in smaller setups, and it delivers consistently pro-quality results. It’s also incredibly portable—I’ve tossed it in a backpack for remote sessions, and it never skips a beat. For anyone starting out or looking for an affordable but professional-grade upgrade, the iD14 is a rock-solid choice.
Special Consideration:
The JFET DI input is a standout feature for guitarists, offering a warm, analog feel when recording directly.
6. MOTU 828 (2024 Version)

MOTU 828
The MOTU 828 (2024) is a feature-rich, rugged interface designed for studio and live use. With USB-C connectivity, multiple I/O options, and a compact build, it’s an excellent choice for professionals needing flexibility and portability.
Best For:
- Mid-tier to advanced users requiring reliable performance for multitrack recording.
- Live performers and engineers needing durable gear for on-the-road use.
Why It’s Popular:
The 828 is known for its robust build, versatile I/O, and MOTU’s rock-solid drivers. Its 24-bit/192 kHz recording quality ensures professional-grade sound.
Ideal Use Case:
- Great for multi-instrument setups or bands in live and studio settings.
- Ideal for mobile recording rigs.

Compatibility:
- Formats: USB-C
- OS: macOS, Windows
Pros:
- Comprehensive I/O options.
- Rugged design.
- High-quality audio conversion.
Cons:
- Lacks AVB networking support.
Personal Take:
The updated MOTU 828 is rugged, reliable, and incredibly versatile. I’ve used it in both studio and live settings, and it handles both like a champ. The USB-C connectivity keeps things modern, and the sound quality is clean and transparent. What I love most is the sheer flexibility of the I/O—it’s perfect for multi-instrument setups or live recordings. If you need something tough and dependable, this is it.
Special Consideration:
Perfect for users who need flexible routing for both live and studio environments.
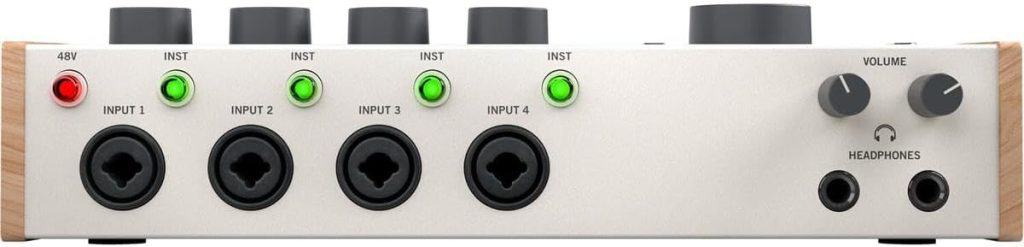
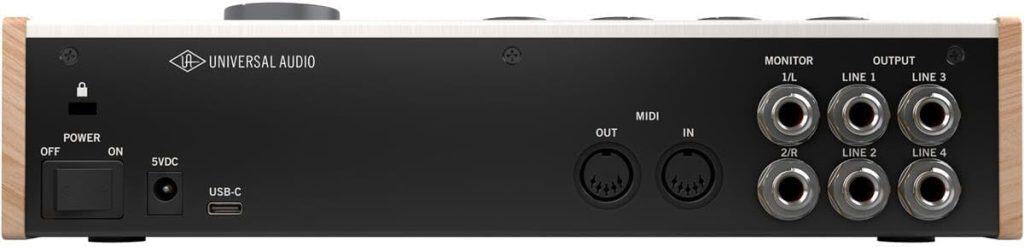
7. Universal Audio Volt 476P

Universal Audio Volt 476P
Part of the great Volt series, the Universal Audio Volt 476P is a 4-in/4-out USB-C audio interface that combines high-quality audio performance with built-in analog compression and preamp emulation inspired by UA’s iconic 1176. With four vintage mic preamps and an onboard 76 Compressor, it’s perfect for users looking to add analog warmth and control during recording.
Best For:
- Musicians, vocalists, and producers seeking vintage analog character in a compact interface.
- Small studios requiring multiple inputs for tracking vocals and instruments.
Why It’s Popular:
The Volt 476P stands out for its integration of UA’s 76 Compressor emulation, providing classic compression tones at an affordable price. Its straightforward setup and high-quality components make it accessible to both beginners and professionals.
Ideal Use Case:
- Great for vocalists and instrumentalists who want built-in compression and vintage warmth during recording.
- Perfect for small project studios or solo artists needing a multi-input interface.
Compatibility:
- Formats: USB-C
- OS: macOS, Windows
Pros:
- Four high-quality preamps with vintage mode.
- Built-in 76 Compressor for analog-style compression.
- Compact and portable.
- Affordable for its feature set.
Cons:
- Limited I/O for larger setups.
- Compression settings are fixed, offering less flexibility than standalone units.
Personal Take:
The Volt 476P feels like a secret weapon for small studios. The onboard 76 Compressor is a game-changer—it saves so much time and adds just the right amount of analog character to vocals and instruments. I’ve used it for quick vocal takes and it instantly sounded polished, like I’d spent hours tweaking in the mix. It’s compact, affordable, and so user-friendly. If you’re after that vintage vibe without the hassle of external gear, the Volt 476P delivers in spades.
Special Consideration:
Ideal for creators looking to combine vintage analog sound with modern digital workflows in a compact package.
Buyers Guide
After helping countless producers set up their studios, I’ve noticed one common mistake: choosing an interface based on price alone. Let me walk you through what actually matters, whether you’re just starting out or looking to upgrade your professional setup.
Connection Types Demystified
Think of these connections like highways – some are bigger and faster than others:
| Connection | Best For | Real-World Benefit | Potential Drawback | Example Use |
| USB 2.0 | Beginners | Works with any computer | Can handle fewer tracks | Recording 1-2 instruments |
| USB-C | Most users | Fast enough for small bands | Needs modern computer | Full band recording |
| Thunderbolt | Pro studios | Record 32+ tracks at once | Expensive gear needed | Commercial studios |
| PCIe | Commercial studios | Massive track counts | Can’t move between computers | Professional studios |
Input/Output Guide
Understanding Preamps
Preamps are like microphone boosters. Here’s what you need:
- Podcasting/Streaming: 1-2 preamps
- Perfect for one mic + guest
- Home Studio: 2-4 preamps
- Record vocals + guitar simultaneously
- Band Recording: 8+ preamps
- Record drums or full band live
Essential Connections Explained
- Line Inputs
- For keyboards and synthesizers
- For drum machines
- For connecting guitar pedals
- Real example: Plugging in your synth and electric guitar at the same time
- Headphone Outputs
- One output: Solo work
- Two+ outputs: Band rehearsal monitoring
- Pro tip: More outputs = everyone gets their own mix
- Digital Connections Made Simple
- ADAT: Add 8 more inputs later (like when you start recording drums)
- S/PDIF: Connect digital keyboards or effects
- Word Clock: Keeps multiple interfaces in perfect sync
- Think ahead: Starting small? Make sure you can expand later
Software Integration
What to check before buying:
- ✓ Works with your recording software (DAW)
- ✓ Recent driver updates (check the manufacturer’s website)
- ✓ Read user reviews about stability
- ✓ Included software value
💡 Beginner Tip: Most interfaces come with a basic DAW – great for starting out. But focus on driver stability first. Nothing’s worse than crashes during a perfect take!
Future-Proofing Your Setup
Think about your future needs:
- Starting Small
- 2 inputs good for vocals + guitar
- Can add more inputs via ADAT later
- Budget: $100-300
- Growing Setup
- 4+ inputs for small band
- Digital inputs for expansion
- Budget: $300-700
- Professional Studio
- 8+ inputs for full bands
- Multiple headphone outputs
- Budget: $700+
💡 Pro Tip: I started with a basic 2-input interface and added more channels via ADAT when I needed to record drums. This gradual approach saved me money and helped me learn what I actually needed.
Remember: The perfect interface is one that fits your current needs with just a little room to grow. Don’t get overwhelmed by features you might never use – focus on quality preamps and reliable performance first.
Next up, I’ll share some real-world tips that’ll help you get the most from your interface, no matter which one you choose.
Pro Tips for Your Audio Interface
After years of troubleshooting and optimizing audio interfaces in both home and professional studios, here are the essential tips that’ll save you hours of frustration.
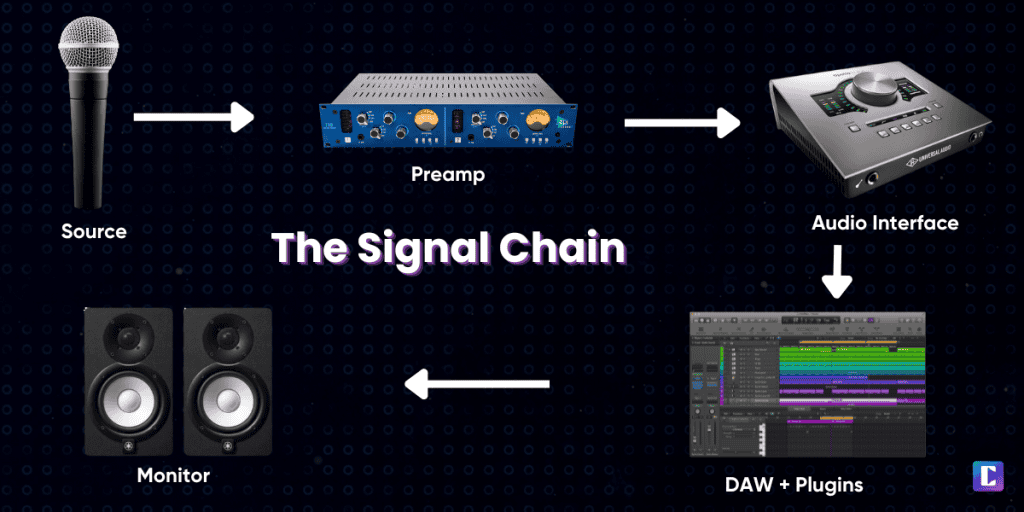
Signal Flow Management
Best Practices for Clean Signal:
- Input Gain Staging
- Green LEDs: Perfect
- Yellow LEDs: Occasional peaks OK
- Red LEDs: Too hot! Turn it down
- Pro Tip: Aim for peaks around -12dB

| Signal Level | What It Means | Action Needed |
| Too Low | Noisy recording | Increase preamp gain |
| Just Right | Clean signal | Keep recording! |
| Too High | Distortion | Reduce input gain |
Daily Maintenance Checklist
Keep your interface running smoothly:
- ✓ Weekly driver checks
- ✓ Monthly connection cleaning
- ✓ Regular firmware updates
- ✓ Dust-free environment
Cable Management
- Use balanced cables when possible
- Label all connections
- Check for cable wear
- Keep cables untangled
Performance Optimization
Buffer Size Guide:
- Recording: 64-128 samples
- Mixing: 512-1024 samples
- Mastering: 1024+ samples
Quick Performance Fixes:
- Disable Wi-Fi while recording
- Close unnecessary programs
- Use direct monitoring when tracking
- Create dedicated recording templates
Common Issues & Fast Solutions
| Problem | Likely Cause | Quick Fix |
| No Sound | Wrong input/output selected | Check DAW preferences |
| Crackling Audio | Buffer size too low | Increase buffer size |
| High Latency | Buffer size too high | Use direct monitoring |
| Driver Crashes | Outdated drivers | Update/reinstall drivers |
Emergency Recording Tips:
- Always have backup cables ready
- Keep old drivers installed as backup
- Save optimal settings as presets
- Document your working configurations
Pro Tip: Create a “pre-flight” checklist for important recording sessions. Mine looks like this:
💡 Pro Tip: Create a “pre-flight” checklist for important recording sessions. Mine looks like this:
- Update drivers last week (not day-of!)
- Test all inputs/outputs
- Set proper buffer size
- Create backup routing
- Check all cable connections
Remember: Most interface issues come down to three things: drivers, cables, or settings. Start troubleshooting with these basics before assuming your interface is broken.
Don’t be afraid to reach out to manufacturer support – they’ve usually seen your issue before and can help quickly. I once spent days troubleshooting what turned out to be a simple driver conflict!
Conclusion: Finding The Best Audio Interface for You
After exploring these incredible audio interfaces, one thing is certain: the “best” audio interface truly depends on you—your goals, your workflow, and the sounds you want to create. For beginners, reliability and simplicity are everything, which is why something like the Focusrite Scarlett 2i2 is such a trusted choice. If you’re running a professional studio or tackling more complex projects, investing in an interface like the Universal Audio Apollo x8p or Apollo Twin X can completely transform the quality of your productions.
Here are a few truths I’ve learned over years of trial, error, and countless sessions:
- Good preamps and stable drivers beat flashy features. You want gear that works consistently, day in and day out.
- Think ahead. Choose something that fits your needs now but won’t feel like a limitation as you grow.
- Connection types matter. Whether it’s USB-C, Thunderbolt, or ADAT, make sure your interface plays nice with your setup.
- Treat your gear right. A clean setup and regular updates go a long way toward keeping your interface running smoothly.
Ultimately, your audio interface is the bridge between your creativity and the world. Whether you’re recording your first demo or mixing a full album, the right interface will elevate your craft. Take the time to pick the one that feels right for you, and trust me—your future projects will sound better for it.
Now it’s over to you: Which interface feels like your perfect match? Let your needs, and your dreams, guide you. Your music deserves it.
FAQs
Here are some of the most frequently asked questions about


