
Do I Need a Preamp? Built-in vs. external preamp comparison

Let’s tackle one of the most common questions I get in my courses: “Do I need a preamp?” Here’s the truth – while dedicated preamps can be fantastic tools, they’re not always necessary for creating professional recordings.
In short, a preamp can take your sound from good to great. But this answer needs a caveat, a-full-blog-post-kind-of-caveat. While having a preamp is something you might eventually need to get, you can go a long way without one.
Take this interesting fact: Finneas produced Billie Eilish’s breakthrough hit “Ocean Eyes” using just the built-in preamps of a modest audio interface. That’s right – a Grammy-nominated track, produced with the same kind of gear you might already have. (source)
In this blog post, I’ll help you understand exactly when you need a dedicated preamp and when your interface’s built-in preamp is more than enough. Let’s cut through the noise and make sure you invest your money where it matters most.
This is part of my ultimate guide to vocal production. And since my conclusion veers towards you getting a good audio interface regardless of the decision about preamps, here is my roundup of the best audio interfaces in the market. This, of course, should be coupled with a choice from this list of the best microphones for vocal production. And If you need a fuller guide to your studio setup, you can check my comprehensive review of the best vocal production gear.
Let’s now turn to your question: “Do I need a preamp?”

TLDR: Do I need a preamp?
- For most home recording situations, your audio interface’s built-in preamp is perfectly sufficient
- Dedicated preamps are mainly necessary for specific scenarios (low-output mics, particular sonic flavors, acoustic vocal-centered recordings with minimal tracks)
- The quality of your audio interface (and its built-in preamp) is a crucial element in you decision
- Invest in room treatment and a good microphone before considering a preamp
- Modern interface preamps are capable of professional-quality recordings
- Budget guide: Spend money on acoustic treatment first, then microphone, then monitoring, and finally preamps
We are reader supported; we earn a commission when you make a purchase through our links.
What Is a Preamp? A Simple Explanation
Let me break this down in the simplest way possible – because I remember how confusing all this gear talk was when I first started recording.
Quick Preamp Definition
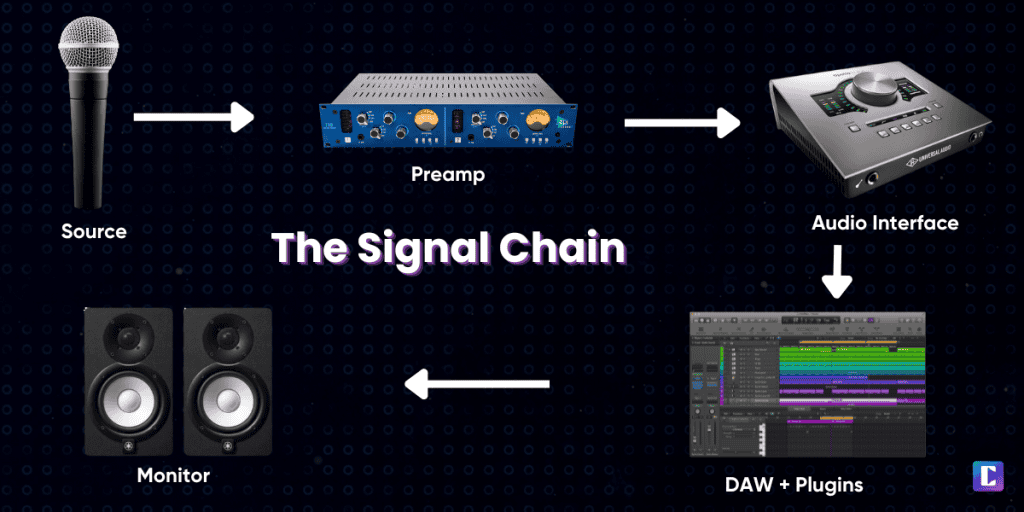
A preamp (preamplifier) takes the tiny electrical signal from your microphone and boosts it to a level that your recording equipment can actually use. Think of it like a translator between your mic and your recording device.
Basic Signal Flow:
| Stage | What Happens |
|---|---|
| Microphone | Creates tiny electrical signal |
| Preamp | Boosts signal by 30-70dB |
| Interface/Mixer | Converts to digital/routes signal |
| DAW | Records boosted signal |
Why Preamps Matter
- Signal Quality:
- Boosts without adding noise
- Maintains signal clarity
- Can add pleasant coloration
- Preserves dynamic range
Types of Preamps You’ll Encounter:
Built-into Interface:
- Clean and neutral sound
- Digital control
- Cost-effective
- Ready to use
Standalone Units:
- More gain available
- Optional coloration
- Premium components
- Specialized features


💡 Pro Tip: The quality of preamp amplification is measured by how cleanly it can boost your signal without adding unwanted noise or distortion. More expensive doesn’t always mean better – it often just means more options!
Next up, we’ll compare built-in versus dedicated preamps so you can understand the real differences between them. Because once you know how preamps work, choosing the right one becomes much easier.
Built-in vs. Dedicated Preamps: What’s the Real Difference?
Let me tell you something that might save you some money: when I first started recording, I was convinced my interface’s preamps were holding me back. Turns out, I was just using my microphone wrong! But let’s break down what actually matters when comparing these two options.
Think of a preamp like a magnifying glass for your microphone’s signal. Both types do the same fundamental job, but here’s how they differ:
🎛️ Quick Comparison Guide:
| Feature | Built-in Interface Preamp | Dedicated Preamp |
| Gain Range | 45-65dB (usually enough) | 60-75dB+ (more headroom) |
| Sound Character | Clean, neutral | Can add color/warmth |
| Price Range | Included with interface | $300-$2000+ |
| Best For | Most recording scenarios | Specific mic/sound needs |
The Real Talk About Quality: Modern interface preamps have come a long way. I’ve recorded professional-quality vocals on both, and here’s what I’ve learned:
- Interface Preamps Excel At:
- Clean, neutral recordings
- Most condenser mic applications
- Basic dynamic mic recordings
- Project studio needs
- Dedicated Preamps Shine With:
💡 Pro Tip: Before considering a preamp upgrade, make sure you’ve mastered these basics first:
- Proper microphone placement
- Room acoustic treatment
- Gain staging technique
- Recording levels optimization
Next up, we’ll explore specific situations where your interface’s built-in preamps are absolutely perfect for what you need. Because sometimes, the best upgrade is learning to use what you already have.
When You DON’T Need a Dedicated Preamp
Here’s something that might surprise you: some of my favorite vocal recordings were done with just an interface preamp and a good condenser mic. Let’s look at when you can confidently skip that expensive preamp purchase and invest your money elsewhere.
🎤 Microphones That Love Interface Preamps:
| Mic Type | Why It Works Well |
| Condenser Mics | High output, needs less gain |
| USB Mics | Have built-in preamps already |
| Active Dynamic Mics | Additional built-in boost |
| Most Studio Mics | Designed for standard preamps |
Perfect Recording Scenarios for Built-in Preamps:
- Vocal Recording:
- Pop/rock vocals with condenser mics
- Voice-over work
- Podcast recording
- Streaming content
- Instrument Recording:
- Acoustic guitar with condensers
- Line-level instruments
- Electronic instruments
- Most amp micing situations
Hidden Features That Make Interface Preamps Awesome:
- Digital control for precise recall
- Built-in pad switches (-10/-20dB)
- Hi-Z inputs for instruments
- Software integration for easy control
Pro Tips for Getting Professional Results:
- Use proper gain staging (aim for -18dBFS peaks)
- Position your mic correctly (this matters more than preamp choice!)
- Take advantage of your interface’s digital features
- Focus on room treatment first
Did you know? Many modern interfaces pack surprising features like:
- Multiple impedance settings
- High-pass filters
- Clip protection
- Software-controlled routing
Next, let’s explore those specific situations where a dedicated preamp actually makes sense – because there definitely are times when you’ll want that extra investment.
Situations Where a Dedicated Preamp Makes Sense
Look, I won’t sugarcoat it – there are definitely times when a dedicated preamp can make a real difference. After years of recording both with and without one, I’ve learned exactly when that investment pays off.
🎛️ Microphones Crying Out for a Dedicated Preamp:
| Microphone Type | Why It Needs More |
| Ribbon Mics | Very low output, needs 60-70dB gain |
| SM7B/RE20 | Requires lots of clean gain |
| Vintage Dynamics | Benefit from impedance matching |
| High-End Condensers | Can showcase preamp quality |
Genre-Specific Sweet Spots:
- Jazz & Classical:
- Clean, transparent gain needed
- Captures subtle dynamics
- Preserves natural tone
- Vintage/Analog Vibes:
- Tube preamps for warmth
- Adds harmonic character
- Creates “expensive” sound
When It’s Worth The Investment:
- Your Interface Preamp Is Maxed Out:
- This is common in low-to-mid range audio interfaces
- Constantly at 90-100% gain
- Hearing noise in quiet passages
- Using low-output mics
- Professional Requirements:
- Commercial studio work
- Client expectations
- Specific sonic requirements
3. Artistic Requirements:
- Mixes with a few very obvious tracks (i.e. you can’t hide in the mix)
- Acoustic tracks where mic clarity is of crucial importance
- Tracks with very vocal-centered mix
💰 Budget Breakpoint Guide:
| Your Budget | Smart Move |
| Under $500 | Stick with interface |
| $500-1000 | Consider budget preamp |
| $1000+ | Quality dedicated unit |
| $2000+ | High-end/multiple options |
💡Pro Tip: If you’re regularly recording quiet sources or using gain-hungry mics, start with a clean gain booster like a Cloudlifter before investing in a full preamp.
Up next, we’ll explore how to maximize your current setup – because sometimes the best upgrade is learning to use what you have more effectively.
Maximizing Your Current Setup
Before you drop hundreds on new gear, let me share some game-changing techniques I’ve learned for getting pro-quality recordings with stock interface preamps. These tricks have saved me thousands in unnecessary upgrades.
⚡ Essential Gain Staging Steps:
| Stage | Target Level | Why It Matters |
| Input Gain | -18 dB peaks | Maximizes headroom |
| Recording Level | Never above -6 dB | Prevents clipping |
| Final Level | Around -6 dB | Streaming ready |
Room Improvement Quick Wins:
Reflection Control:
- Add blankets behind mic
- Place foam in corners
- Use moving blankets as panels
- Create vocal booth with furniture
🎤 Microphone Placement Secrets:
- Distance Guide:
- Vocals: 6-8 inches
- Acoustic Guitar: 6-12 inches
- Guitar Amp: 1-3 inches
- Room Mics: 3-6 feet
- Common Problems & Fixes:
- Plosives? Pull back, add pop filter
- Too boomy? Move off axis
- Too thin? Get closer
- Room noise? Get closer + treat room

Post-Processing Enhancement Tips:
- Light compression (2:1 ratio)
- Subtle saturation for warmth
- Strategic EQ instead of heavy processing
- Parallel processing for thickness
💡 Pro Tip: Record a “safety track” at -6dB lower gain. You’ll thank me when that perfect take has an unexpected peak!
Let’s move on to planning your upgrade path – because when you do decide to invest, you’ll want to make sure you’re spending money in the right places.
Smart Upgrade Path: Where to Invest First
I’ve learned this lesson the hard way: rushing to buy a preamp when other upgrades would have made a bigger difference. Let me show you where your money is best spent first.
🎯 Priority Upgrade Sequence:
| Priority | Investment | Typical Budget |
| 1st | Room Treatment | $200-500 |
| 2nd | Quality Mic | $300-800 |
| 3rd | Monitoring | $300-600 |
| 4th | Preamp | $500+ |
Bigger Impact Upgrades:
- Acoustic Treatment:
- Bass traps ($50-100 each)
- Absorption panels ($30-60 each)
- Diffusers ($100-200)
- DIY options available!
- Microphone Improvements:
- Versatile workhorse mic
- Pop filter/shock mount
- Proper mic stand
- Mic isolation shield
Smart Budget Allocation (Based on $1000):
- 40% – Room Treatment
- 30% – Quality Microphone
- 20% – Monitor Upgrade
- 10% – Cables & Accessories
Future-Proofing Tips:
- Choose interfaces with expandability
- Invest in quality cables
- Pick industry-standard connections
- Consider modular equipment
💡 Pro Tip: Start with the problems you can hear. If you can’t identify preamp quality as your main issue, it probably isn’t your bottleneck right now.
Remember: I’ve seen incredible records made with basic interfaces and great room treatment. But I’ve never heard a great record from an untreated room with expensive preamps.
The key is building your studio piece by piece, focusing on what will make the biggest difference to your sound right now. And sometimes, that means not buying a preamp at all.
Conclusion
After diving deep into the world of preamps, here’s what it really comes down to: for most home recording creators, your interface’s built-in preamps are probably not your limiting factor. The path to better recordings usually starts with room treatment, proper technique, and a quality microphone.
If you’re just starting out, focus on mastering your current setup. When you do feel ready to upgrade, make sure you’re doing it for the right reasons – like needing more gain for a specific microphone or seeking a particular tonal character – rather than chasing an imaginary “professional sound.”
Remember, great records are made by great musicians and engineers, not just great gear. The best investment you can make is in learning to use what you have effectively.


